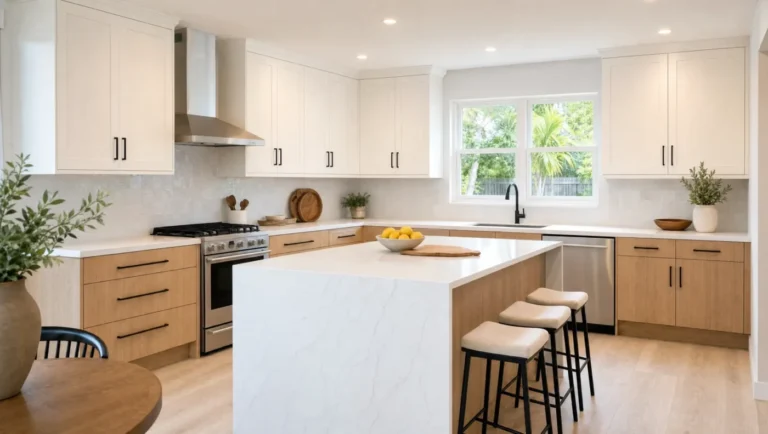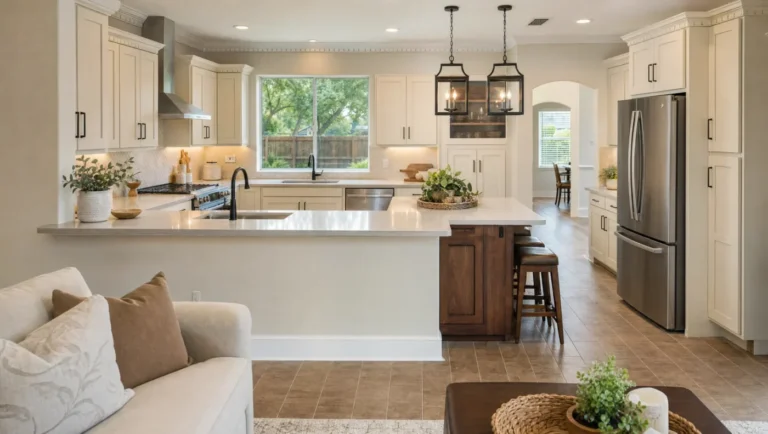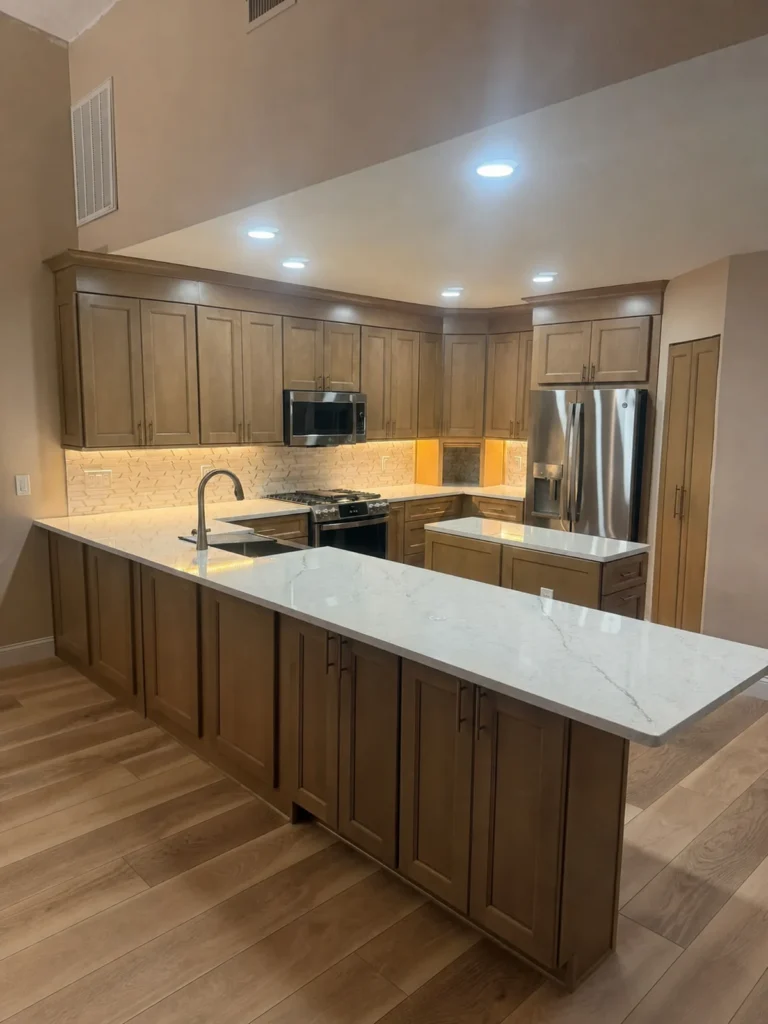
Every kitchen backsplash idea on this page came out of a real kitchen our team designed and built in a real Tampa Bay home. No stock photography, no showroom staging, no renderings. These are fourteen finished backsplashes pulled from the 7,136+ remodels CMK Construction has completed across Hillsborough, Pinellas, Pasco, Sarasota, and Manatee counties. For each one we have named the material, identified the tile brand where tile was used, and explained why the design works, so you can borrow the idea with confidence instead of guessing from a Pinterest board.
The backsplash is the highest visibility surface in the kitchen after the countertop, and it is often the last decision homeowners make and the first one they regret rushing. Below you will find twelve tile designs and three full slab installs, because the slab backsplash is the single biggest trend shift we have seen in Tampa Bay kitchens over the past two years. If you are early in your planning, our kitchen remodeling page walks through how backsplash selection fits into the full design process.
Tile Backsplash or Slab Backsplash: How to Decide
Before the individual ideas, here is the honest comparison our designers walk clients through. Tile gives you pattern, texture, and a lower installed cost. A slab backsplash, usually quartz cut from the same material as the countertop, gives you a seamless look with zero grout lines to clean. In a Florida kitchen where humidity and cooking residue are constant, grout maintenance is a real consideration, not a footnote.
| Factor | Tile Backsplash | Quartz Slab Backsplash |
|---|---|---|
| Typical installed cost | $25 to $60 per sq ft | $70 to $120 per sq ft |
| Grout lines | Yes, requires periodic sealing and cleaning | None |
| Pattern and texture options | Nearly unlimited | Limited to the slab design |
| Best for | Adding personality, contrast, and texture | Seamless, easy to clean, dramatic veining |
| Brands we install | Emser, Happy Floors | Cambria quartz |
Full Slab Backsplash Ideas
1. Full Height Cambria Quartz Slab, Countertop to Cabinets
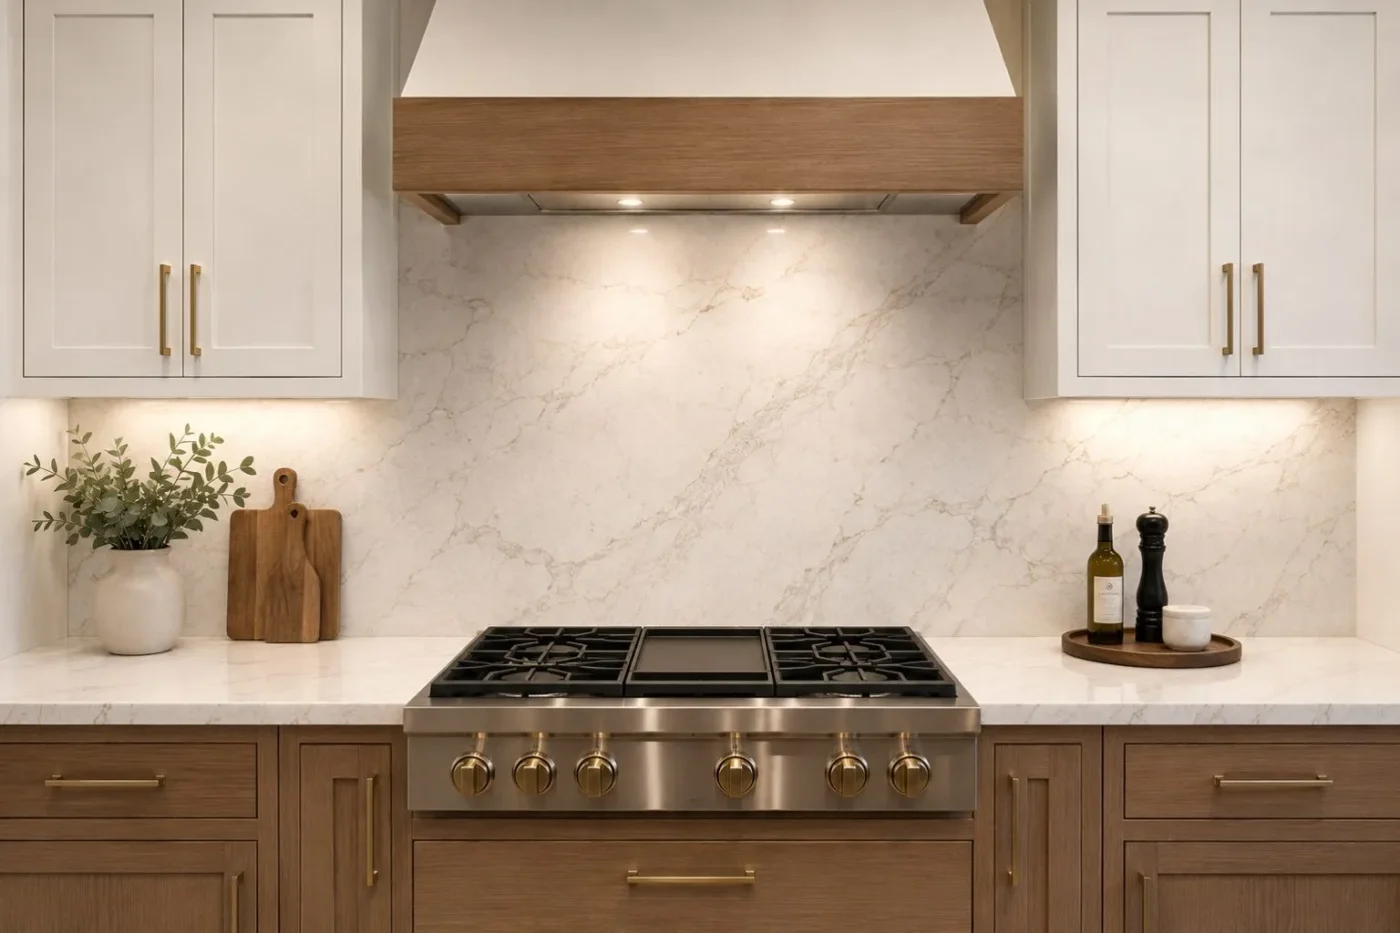
This Sarasota kitchen runs the same Cambria quartz from the countertop straight up the wall to the cabinets and continues full height behind the rangetop to the wood trimmed hood. The warm gold veining flows uninterrupted across the entire cooking zone, the wall wipes clean with one pass, and there is not a single grout line anywhere behind the range. Notice how the slab ties the white shaker uppers and the white oak lowers together, with the brass hardware picking up the veining tones. Because the backsplash is cut from the same material as the counter, the match is perfect. Designer Lindsey templated the counter and backsplash together so the veining aligns where the two surfaces meet, which is a detail that separates a professional install from a fabricator just selling square footage. Budget wise, a full height slab wall like this typically adds $3,500 to $8,000 or more to a kitchen project depending on wall area and material. You can compare quartz options on our kitchen countertops page.
2. Quartz Slab Behind the Range, Tile Everywhere Else
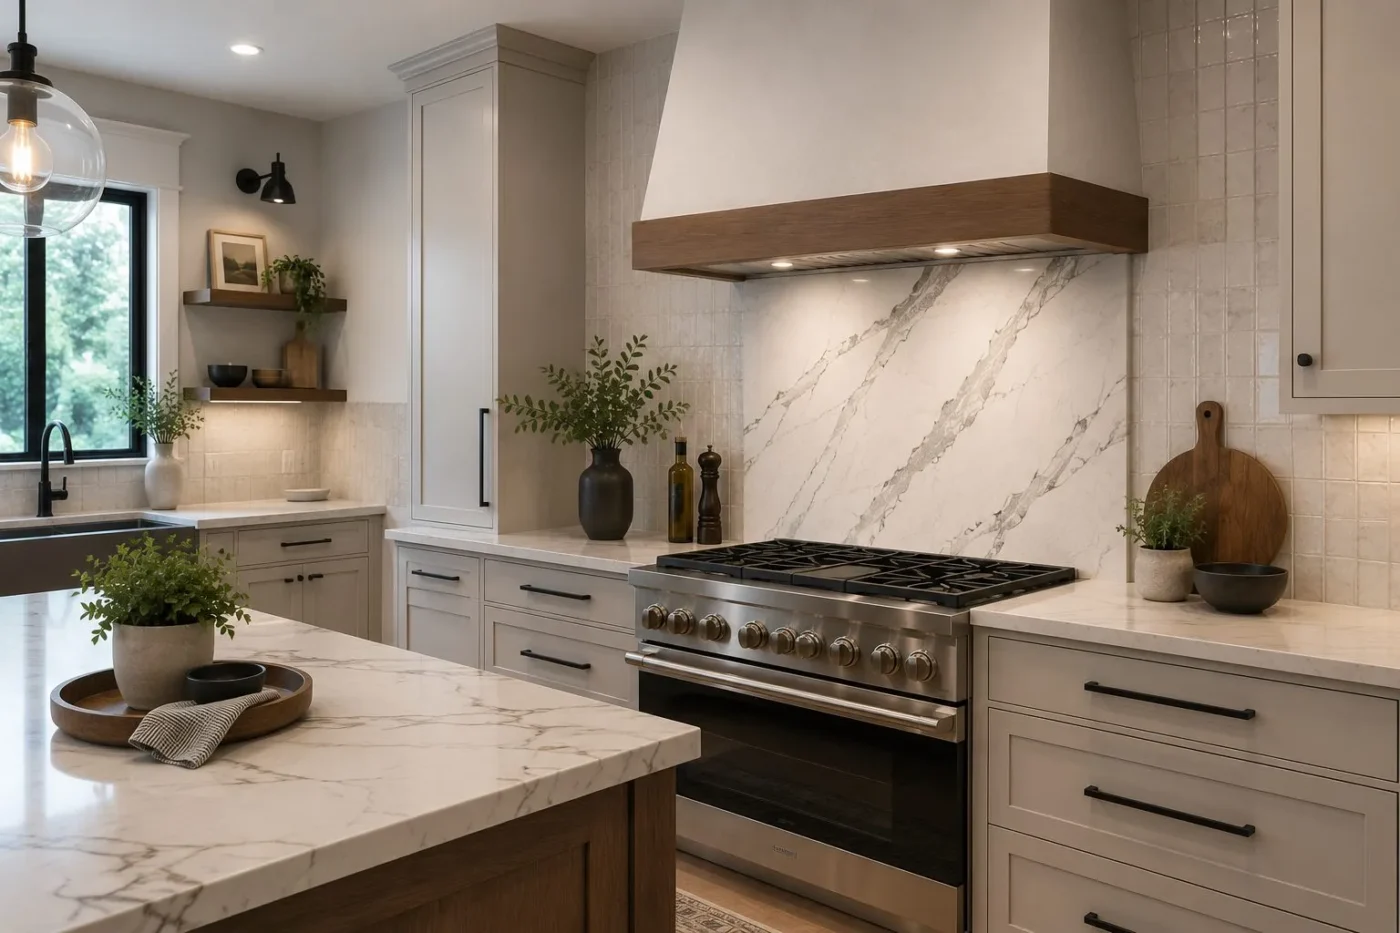
This Wesley Chapel kitchen, designed by Kari, splits the difference. A dramatic quartz slab with bold gray veining sits behind the range where grease and splatter are heaviest, framed by the wood trimmed hood, while a glossy cream Emser tile set in a vertical stack carries the rest of the perimeter, wrapping the sink wall and running behind the open shelving. The slab zone becomes the focal point of the room, and the handmade character of the glazed tile keeps the surrounding walls interesting without competing with it. The homeowner got the easy cleanup exactly where it matters most without paying slab pricing across the entire kitchen. This hybrid approach typically saves 30 to 40 percent compared to slab on every wall, and it is one of the most requested designs in our current projects.
3. Slab Backsplash Matched to a Waterfall Island
In this South Tampa remodel by CMK designer Emily, the same Cambria design wraps the island in a waterfall edge and rises up the range wall as a full slab backsplash. The repetition ties the two strongest features of the kitchen together, and the bold veining reads like a single design decision instead of two separate upgrades. Homes in South Tampa lean heavily into this look because open floor plans put the kitchen on display from the living areas, and the matched slab surfaces photograph beautifully from every angle in the room.
Thinking about a slab backsplash? Call us at (813) 379-2116 or schedule a free in home consultation and we will bring real numbers for your kitchen, not internet averages.
Tile Backsplash Ideas From Real Projects
4. Classic White Subway Tile With Contrasting Grout
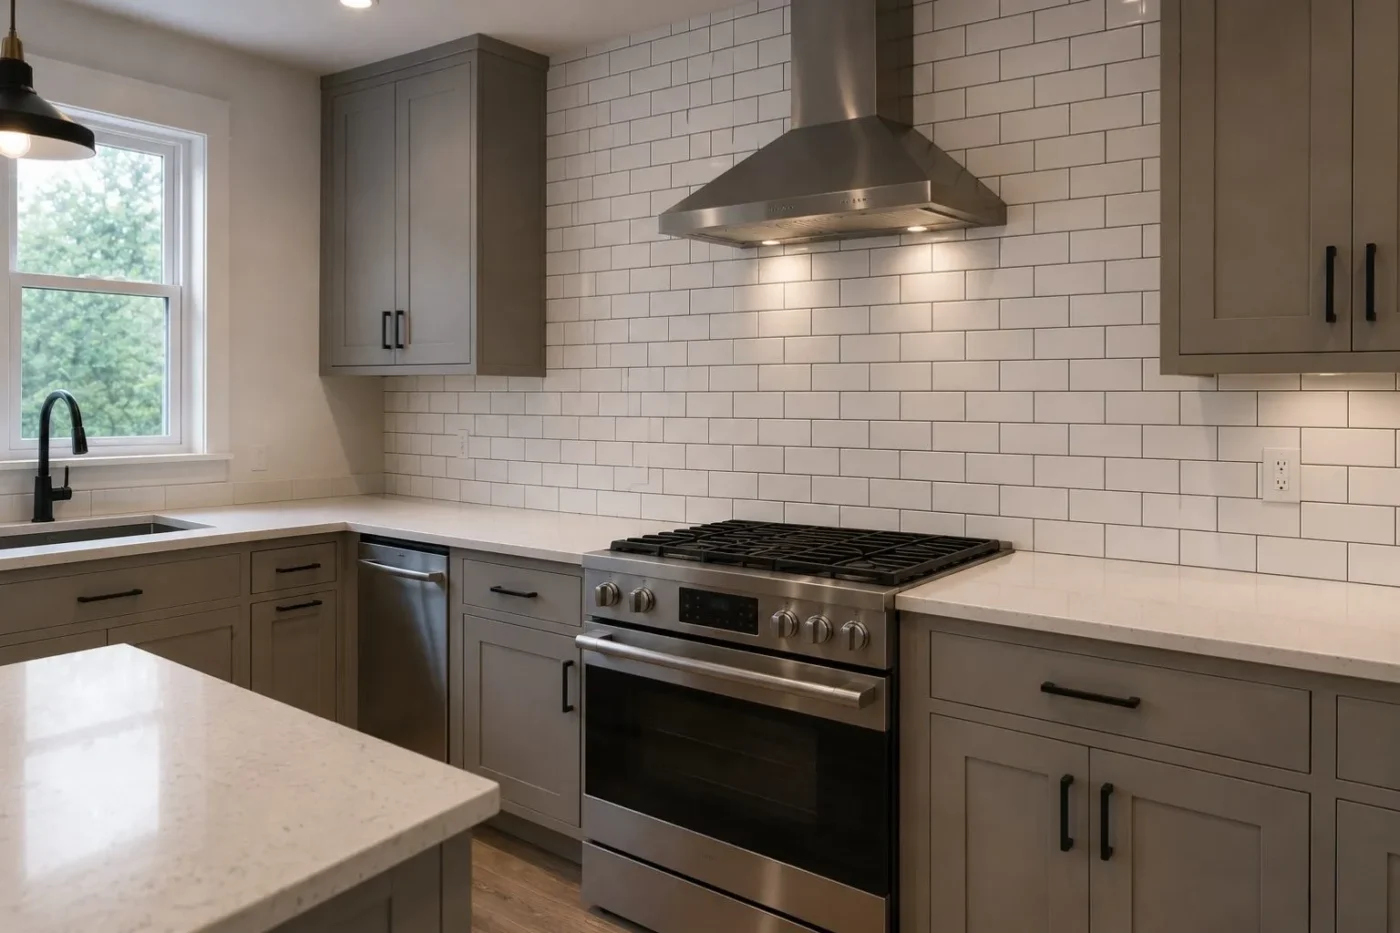
Subway tile is not going anywhere, and this Carrollwood kitchen shows why. An Emser ceramic subway tile in bright white gets a completely different personality from a dark charcoal grout that outlines every tile, and designer Grady ran the tile all the way to the ceiling behind the stainless chimney hood, turning a classic material into a true feature wall. The dark grout adds definition and hides everyday discoloration far better than white grout, which is a practical win in a busy family kitchen, and the graphic grid plays perfectly against the soft greige shaker cabinets and black hardware. If your budget puts most of the money into cabinets and counters, this is the backsplash that never looks like a compromise. It is also the most budget friendly option on this page, typically $25 to $35 per square foot installed.
5. Handmade Look Zellige Style Tile
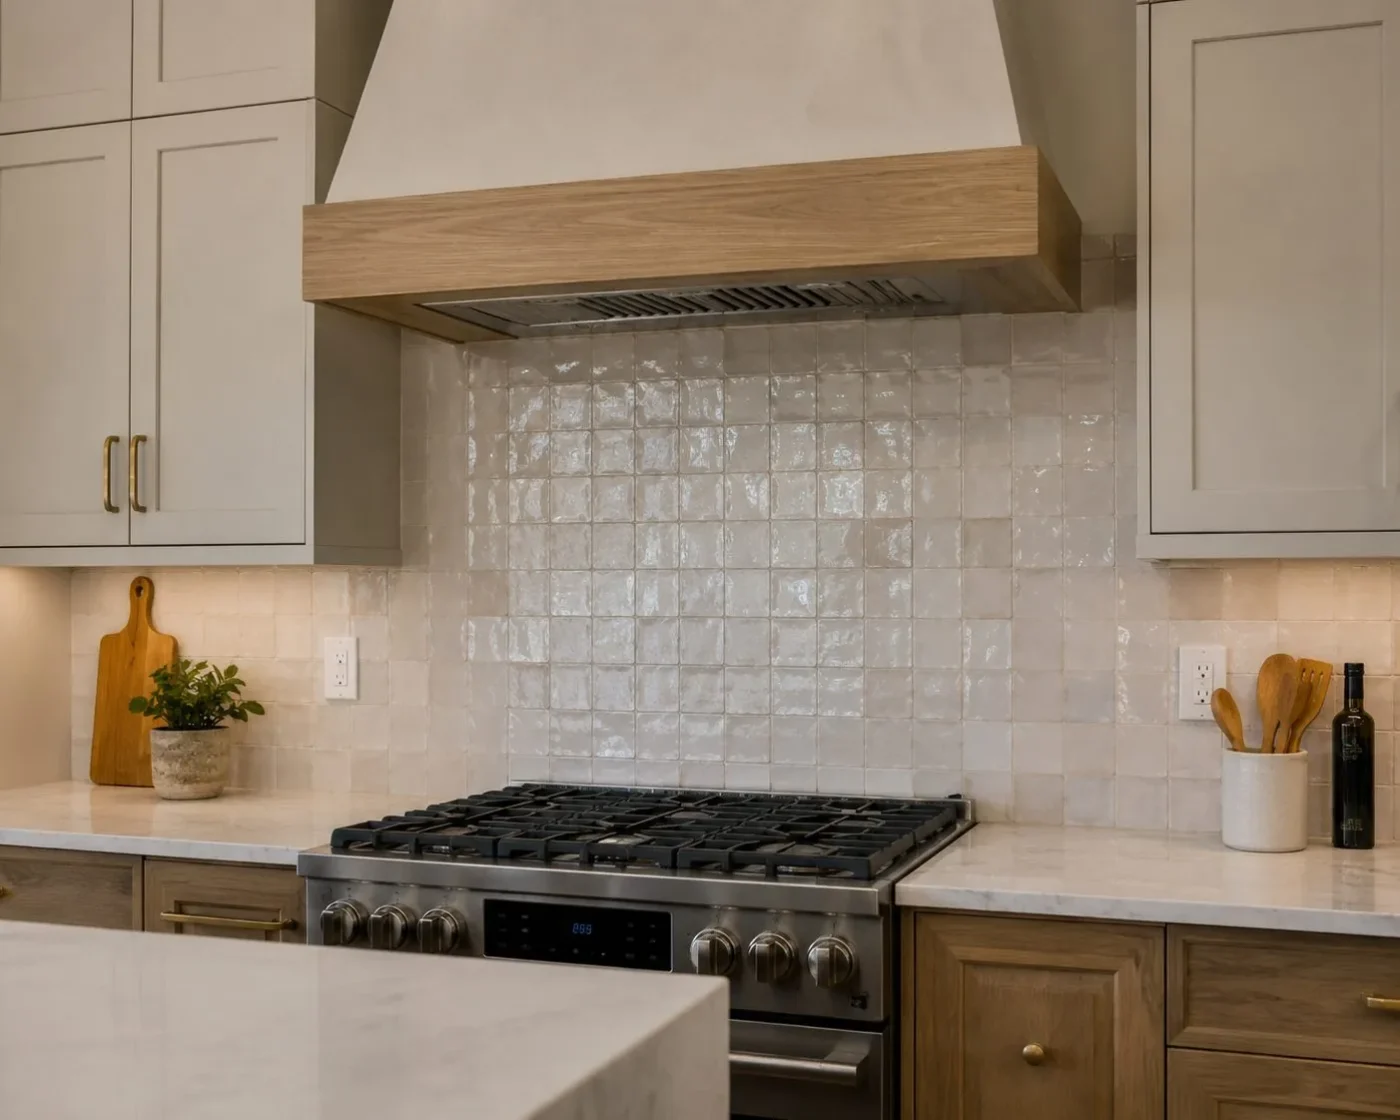
The irregular edges and glossy, rippled glaze of zellige style tile catch Florida light in a way flat tile never will. Designer Lindsey chose an Emser glazed ceramic in a square format for this Palm Harbor kitchen, which reads more custom than the rectangular version most homeowners have already seen, and the slight variation from tile to tile gives the wall depth without adding a busy pattern. The pearl finish bounces the under cabinet lighting around the range wall, sitting beautifully between the plaster hood with its white oak trim band, the cream shaker uppers, and the white oak lowers. Our installers set these with tight joints and minimal grout exposure, which is the detail that makes the finished wall look artisan instead of uneven.
6. Large Format Porcelain, Minimal Grout Lines
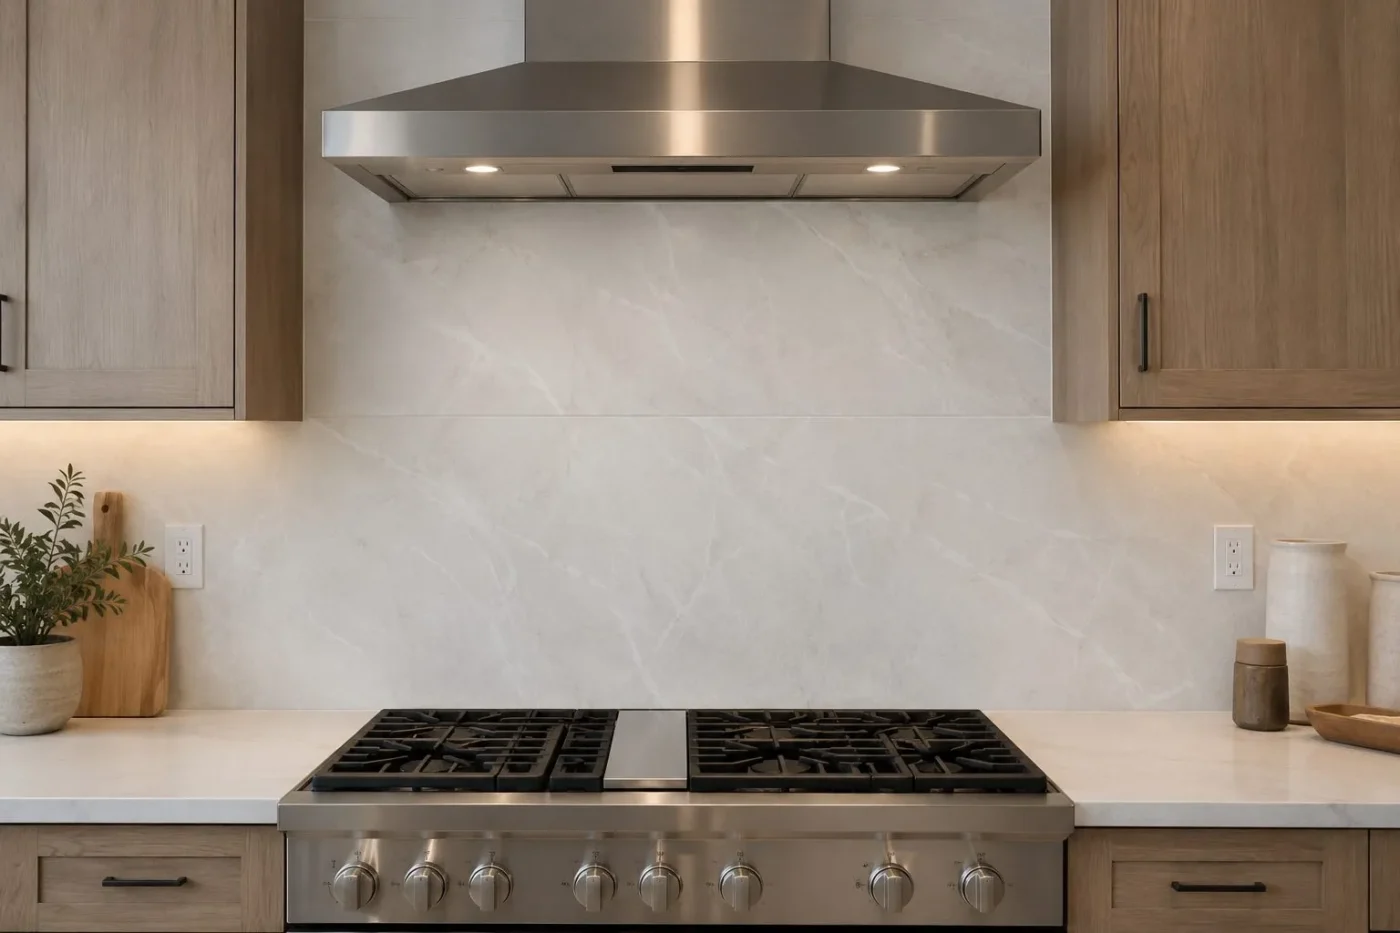
If you love the clean look of slab but the budget says tile, large format porcelain is the answer. For this Clearwater kitchen, designer Kari selected a Happy Floors marble look porcelain in an oversized panel format, and the entire range wall carries exactly one visible horizontal seam. From across the room it reads as slab, with soft veining flowing behind the stainless chimney hood and warming up against the white oak cabinetry. Porcelain also handles heat and moisture better than nearly any other backsplash material, which matters in a kitchen that cooks seven nights a week, and at roughly $40 to $60 per square foot installed it lands a meaningful step below slab pricing. The one caution with panels this size is that they demand a perfectly flat wall and an experienced setter, because a lippage error you would never notice on a 3 by 6 subway tile is obvious on a panel measured in feet.
7. Herringbone Pattern Behind the Range
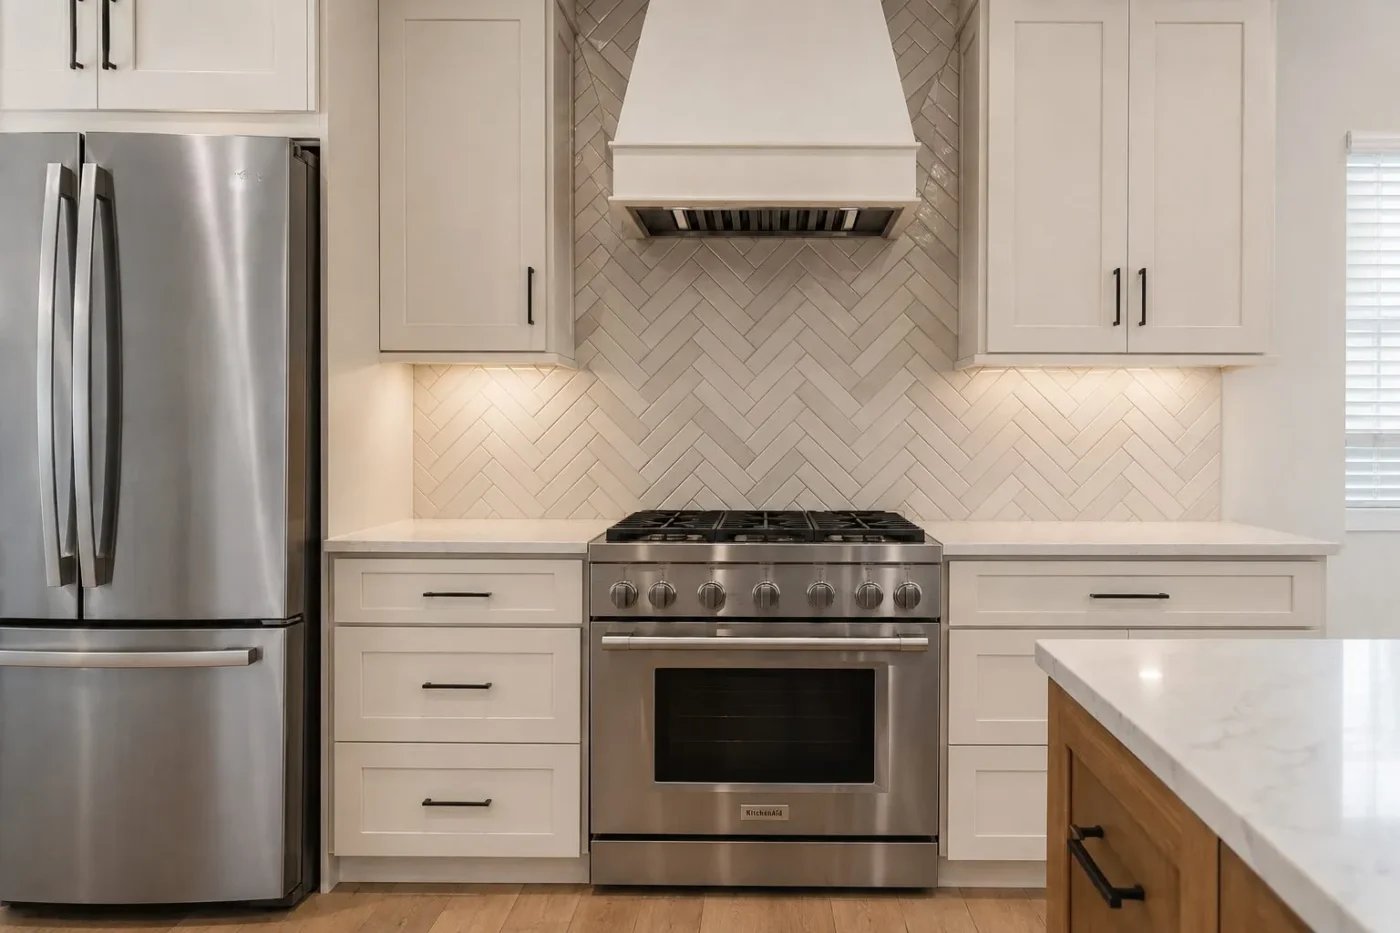
Herringbone turns an ordinary tile into a pattern with movement. Designer Emily took this Lutz kitchen a step further with a two tone design, a creamy white Emser herringbone filling the field while a glossy taupe herringbone band rises alongside the hood, framing it like architectural trim. The pattern runs all the way to the ceiling, so the range wall reads as one continuous feature from the countertop up. Pattern layouts like this add labor time because every cut matters, figure roughly 20 to 30 percent more in setting labor than a straight lay, and a two tone layout adds planning on top of that, since the color transition has to land symmetrically on both sides of the hood. That is exactly the kind of detail our designers draw out before a single tile is ordered, so we typically reserve herringbone for a feature zone rather than the entire perimeter, which keeps the cost reasonable and the impact high.
8. Vertical Stacked Tile for Height
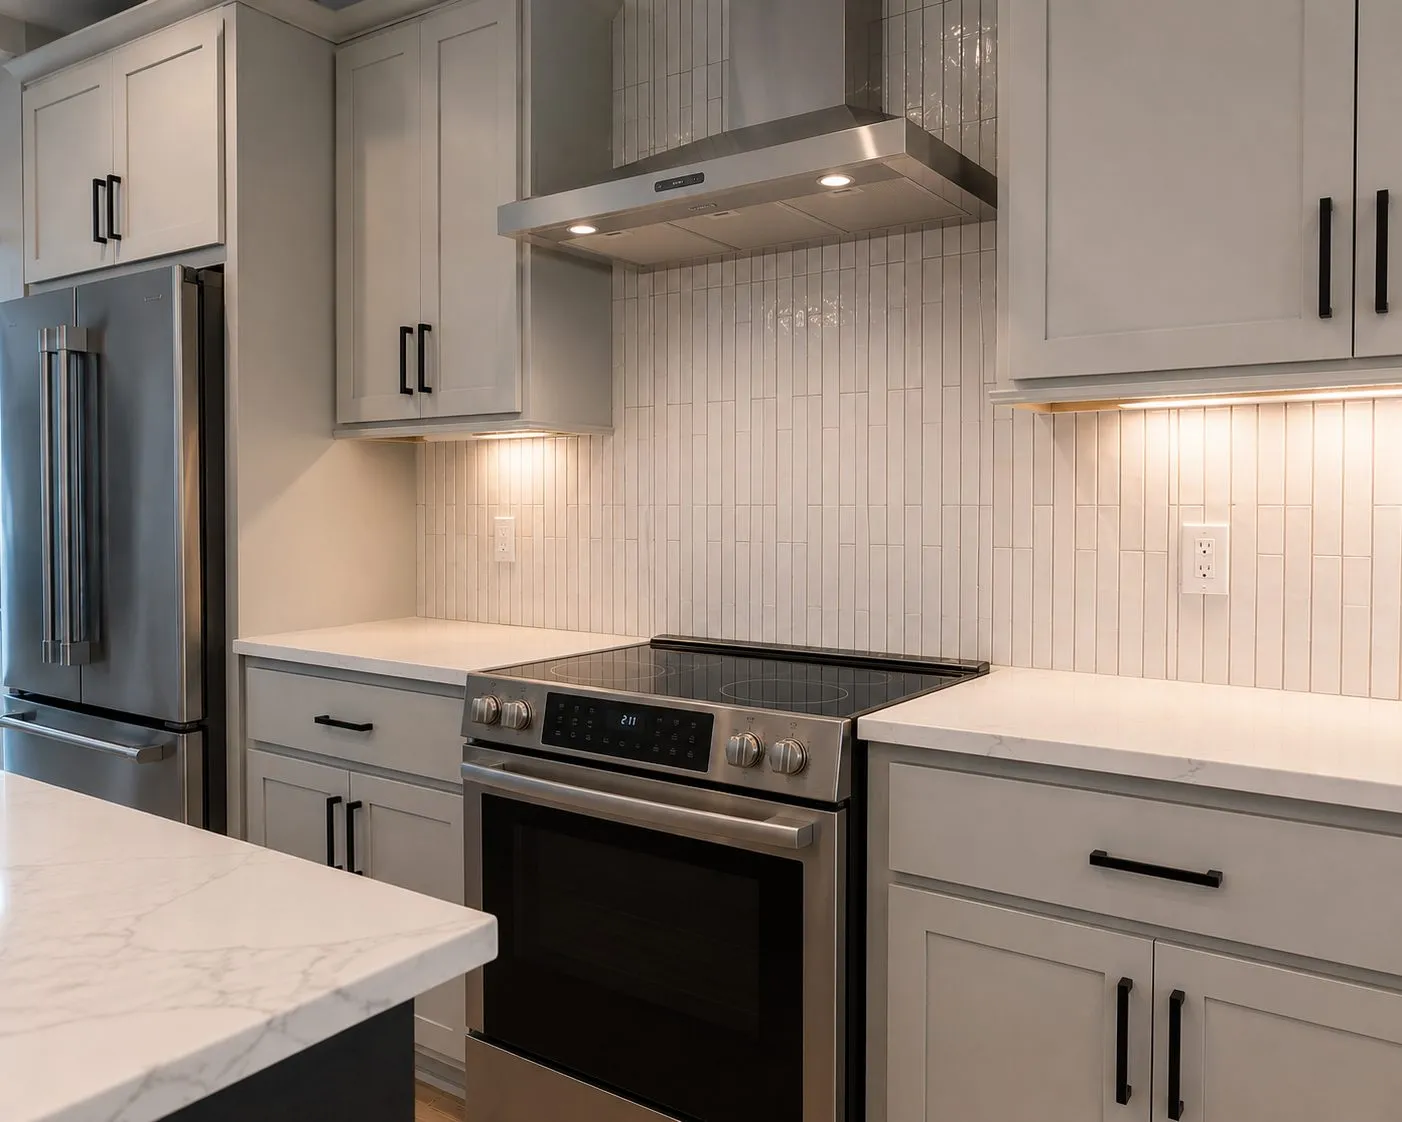
Running tile vertically pulls the eye upward and makes standard 8 and 9 foot ceilings feel taller, and the skinnier the tile, the stronger the effect. In this Odessa kitchen, designer Grady stacked a Happy Floors glossy white skinny tile, the elongated kit kat style, vertically from the counter all the way to the ceiling behind the stainless hood. Hundreds of thin vertical lines give the wall a subtle rhythm that reads as texture from a distance and precision up close, brightening the soft gray shaker cabinets and playing off the dark island base. Stacked layouts demand a truly flat wall and precise setting, because every misaligned joint shows in a grid this tight. That is installer skill, not tile cost.
9. Picket Tile for Subtle Geometry
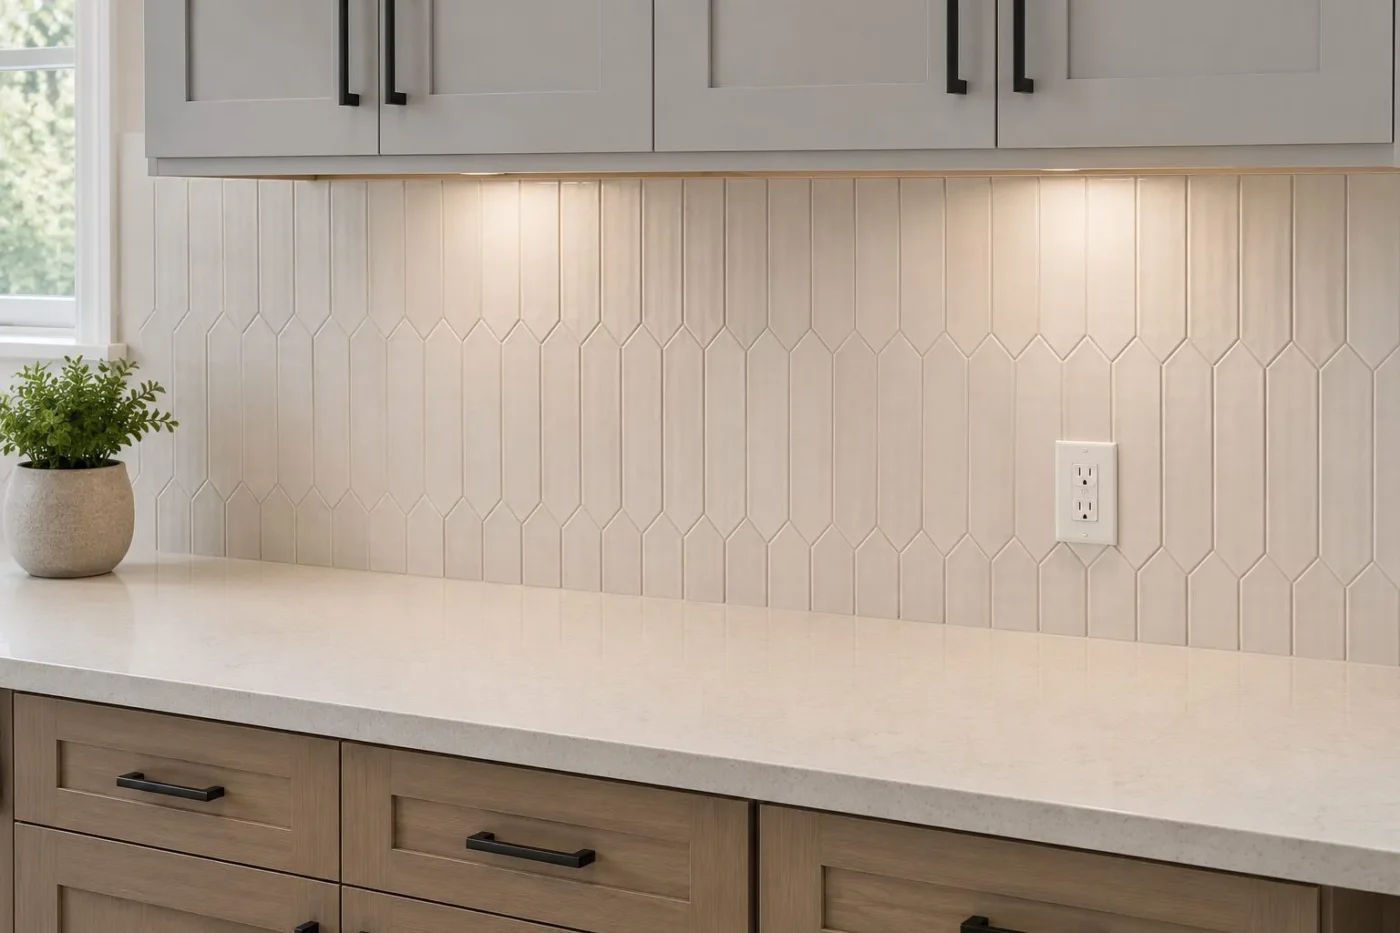
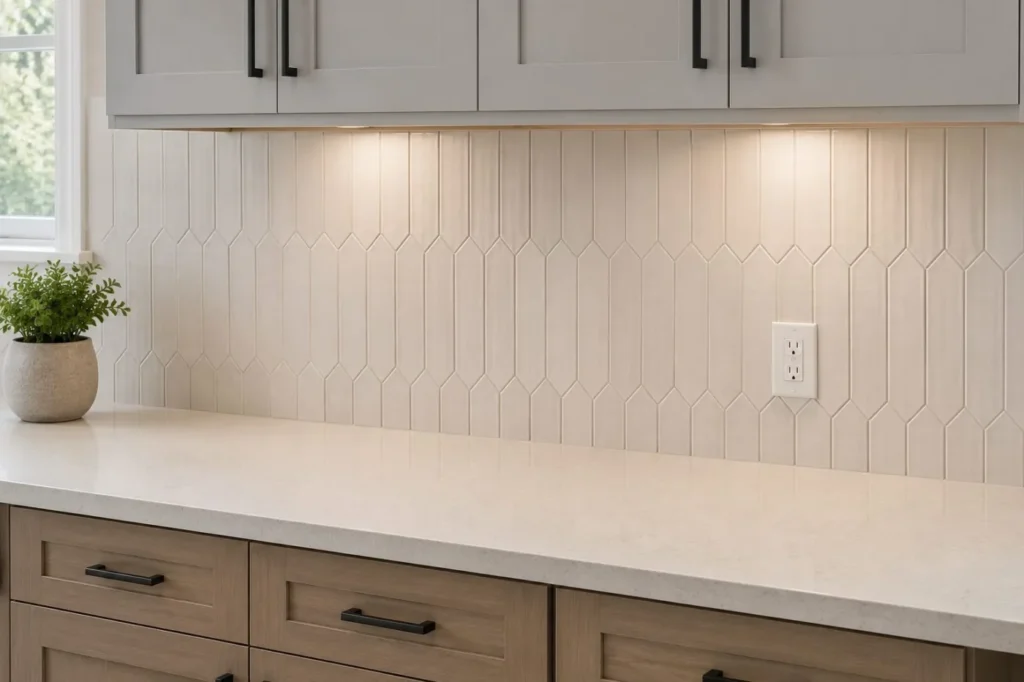
Picket tile, the elongated hexagon shape, gives you geometry without the busyness of a small mosaic. In this Westchase kitchen, designer Kari set an Emser picket in a soft cream vertically instead of the usual horizontal layout, so the points stack into a subtle arrow pattern that adds quiet height to the wall between the gray shaker uppers and the white oak lowers. It reads classic from across the room and detailed up close, which makes it one of the most flexible shapes we install for homeowners who want something beyond subway without committing to a bold pattern. Look closely at the outlet in this photo, it sits squarely centered in the tile pattern rather than cutting awkwardly through it. That is mistake number five from the list below being avoided on purpose, planned during design, not discovered during install.
10. Marble Look Porcelain Run to the Ceiling
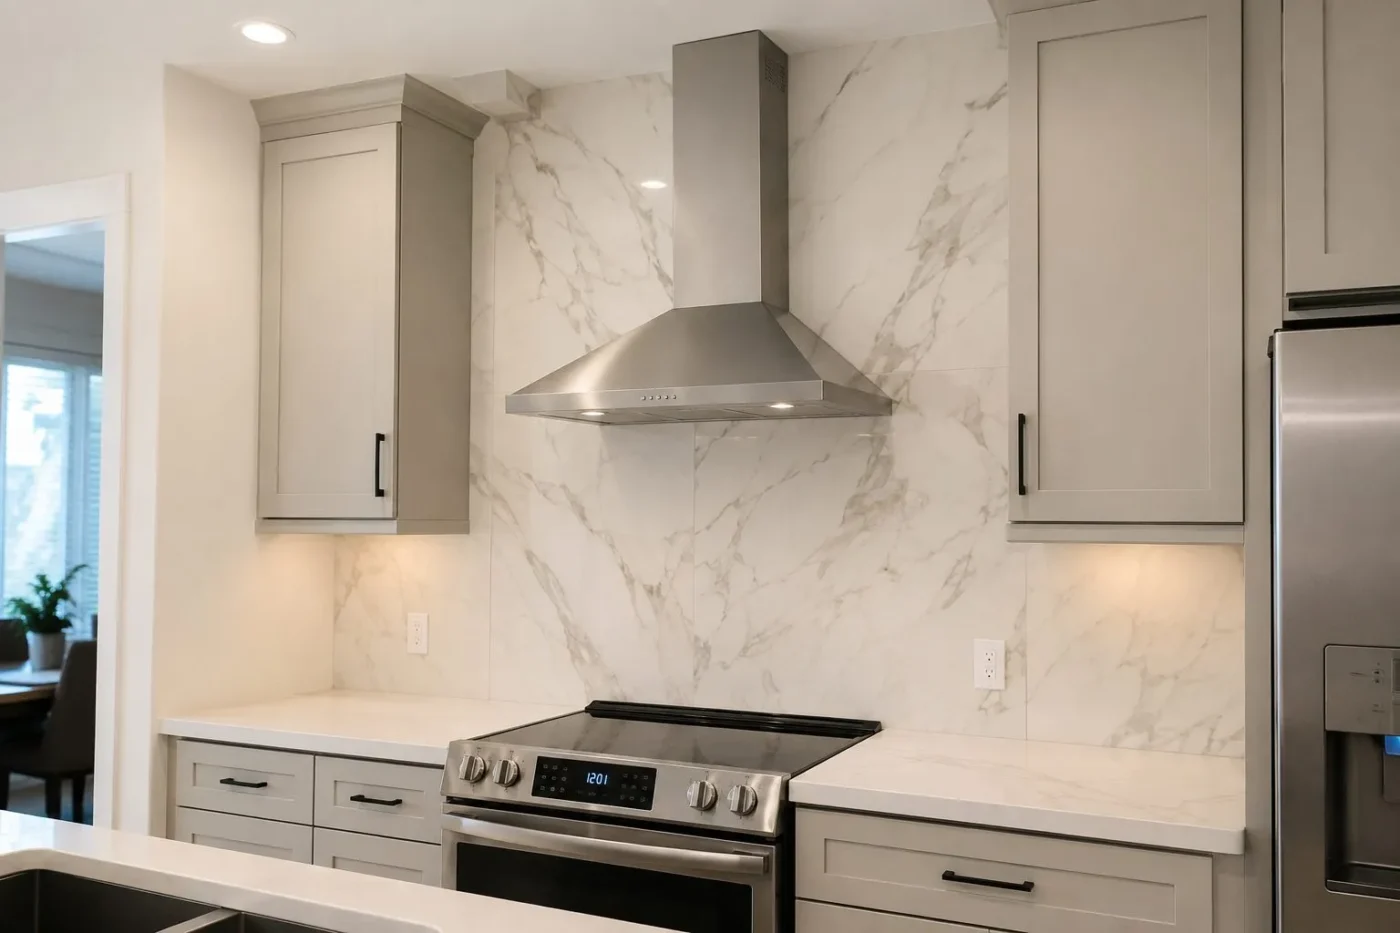
Taking the backsplash all the way to the ceiling is the fastest way to make a kitchen feel custom, and marble look porcelain delivers the veined stone aesthetic without the sealing and staining concerns of real marble. In this St. Petersburg kitchen, designer Lindsey ran a Happy Floors marble look porcelain from counter to ceiling across the entire range wall, with the stainless chimney hood mounted directly on the tile and the greige shaker cabinets framing it on both sides. The dramatic calacatta style veining sweeps across the panels like a single stone face, and that uninterrupted wall does more for the room than any single appliance upgrade could. Bookmatching and vein direction get planned at the design stage on a wall like this, because once the panels are set, the pattern is permanent.
11. Dark Tile Against Light Cabinets
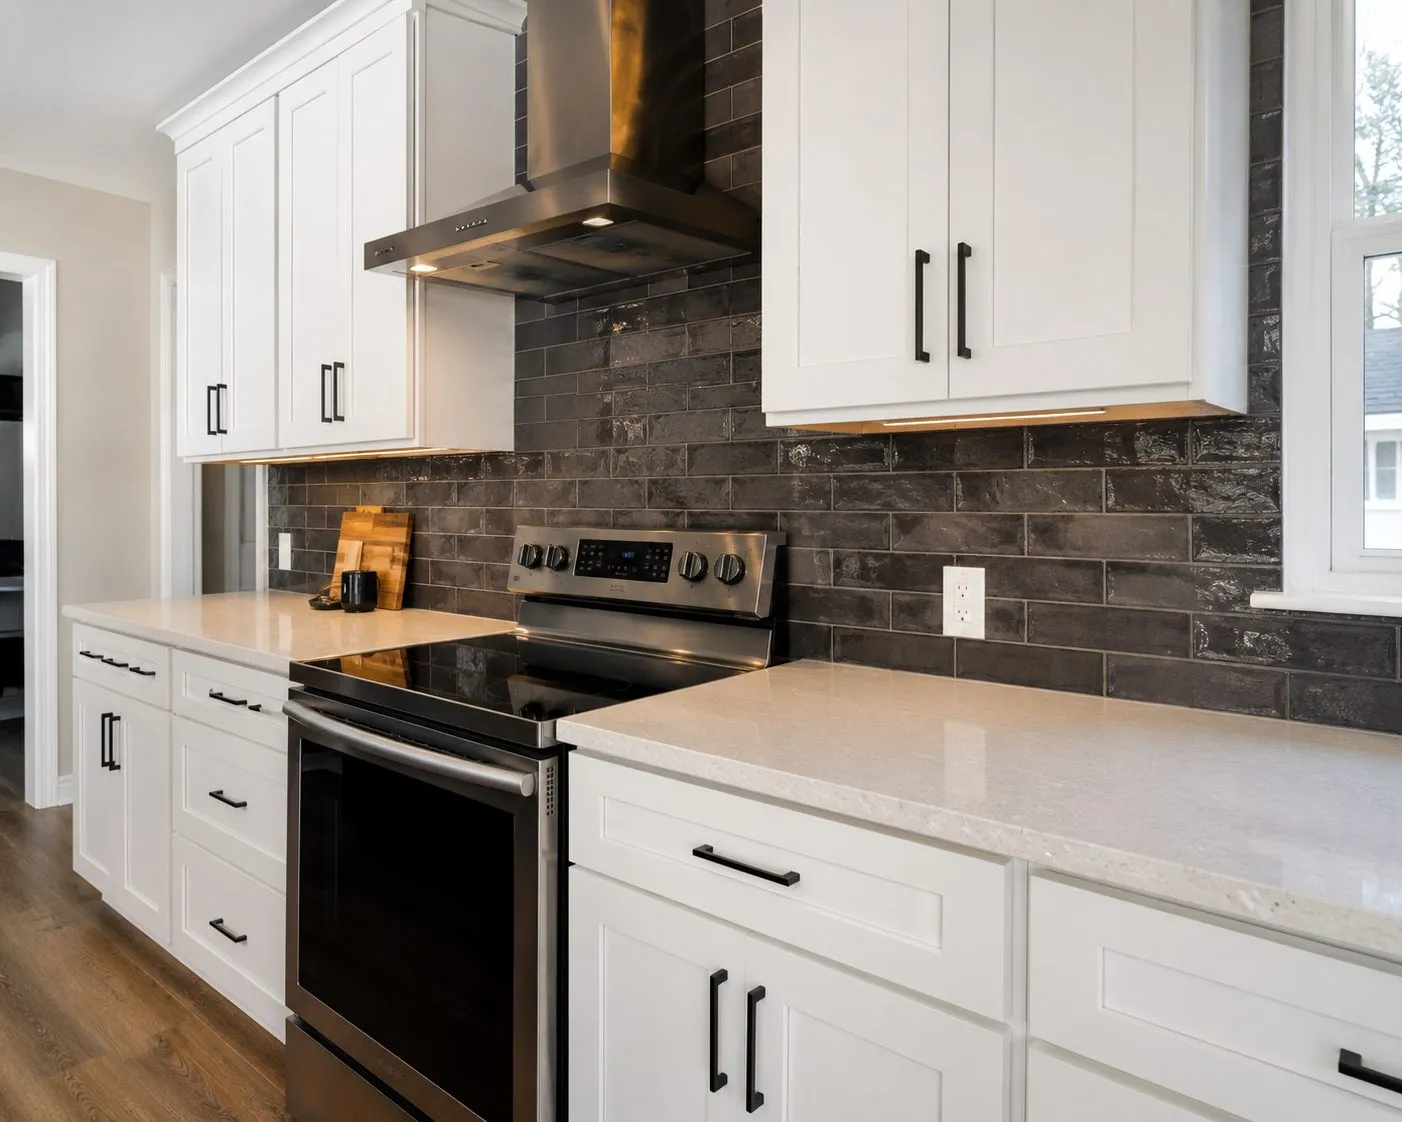
White kitchens do not have to be all white. In this Brandon remodel, designer Emily grounded a bright white shaker cabinet package with a deep charcoal Emser subway tile, and the glossy handmade style glaze keeps the dark wall alive, every ripple in the surface catching light so the tile reads rich instead of flat. The tile runs full height behind the stainless hood and wraps the window wall, and the contrast makes both finishes look more intentional. Dark backsplashes are also forgiving in daily use, hiding splatter and water spots between cleanings. If you worry a dark wall will shrink the room, this kitchen is the counterargument, the under cabinet lighting washing down the glossy tile does the work, and we plan that lighting into the electrical scope on every project like this one.
12. Hexagon Tile With a Color Story
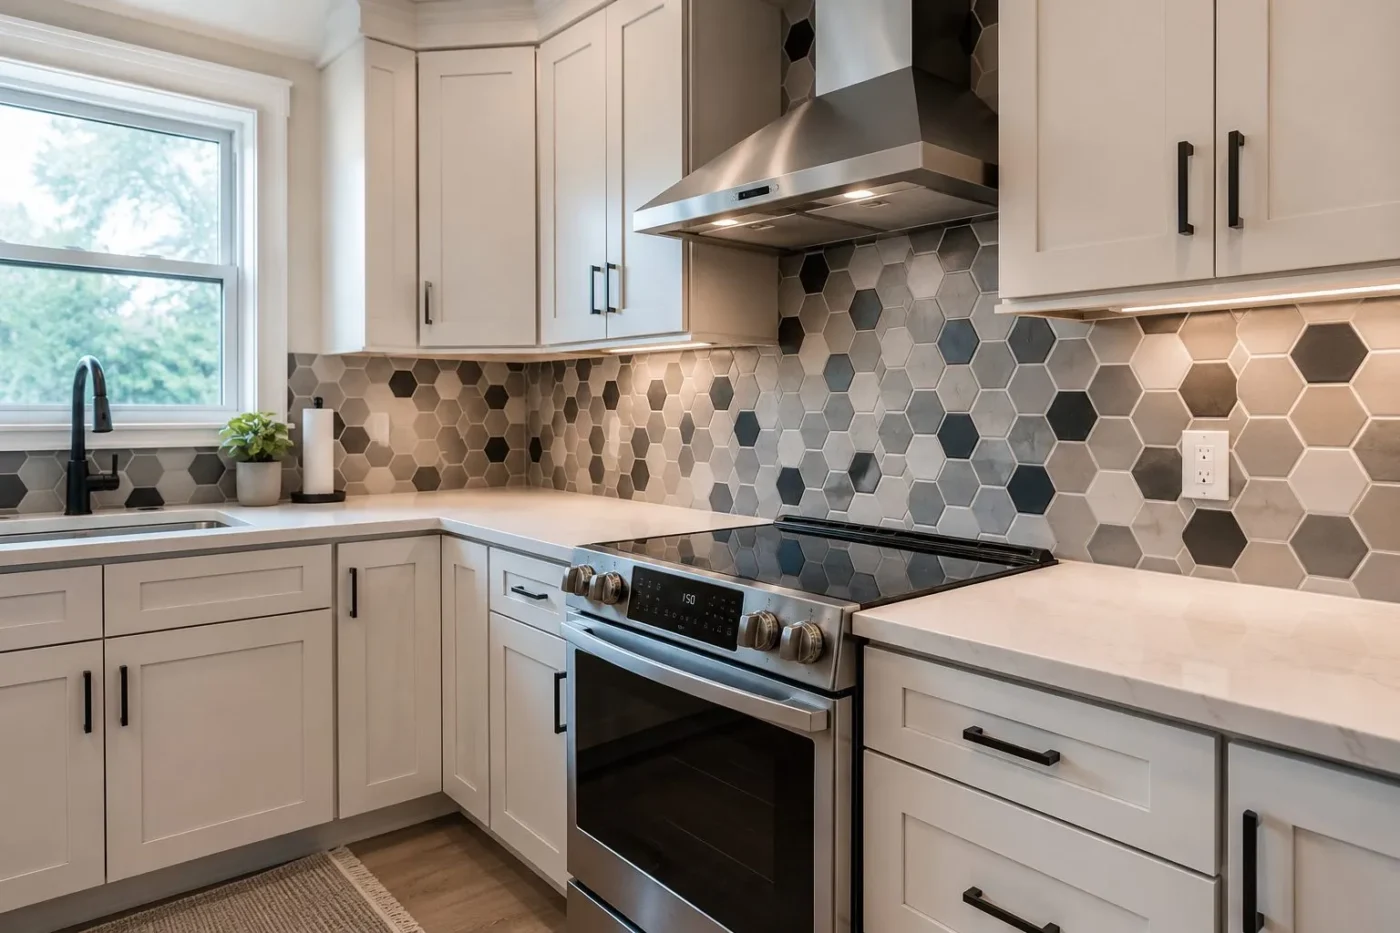
Hex tile brings honeycomb geometry that works in both modern and transitional kitchens. In this New Port Richey project, designer Grady chose a Happy Floors hexagon in a blended mix, cream, soft gray, mid gray, and charcoal scattered in a random pattern that wraps from the sink wall around to the range and runs full height behind the hood. The blend is the color story here, the charcoal hexagons echo the black hardware and faucet, the light tones pick up the cream shaker cabinets and quartz counters, and the tile ties every neutral in the room together. Blended mosaics like this typically run $35 to $55 per square foot installed. A word from our installers on blended patterns like this: random is designed. The tile blend gets dry laid and adjusted before setting so no two dark hexagons clump together, which is the difference between a wall that looks curated and one that looks like the boxes were opened in the wrong order.
13. Textured and Fluted Tile for Dimension
Texture is the design layer most kitchens are missing. In this Land O Lakes kitchen, designer Kari chose a fluted, ridged tile that changes appearance as the light moves through the day, giving a neutral palette real depth. Textured tile does collect a bit more dust in the grooves, so we recommend it for zones away from the heaviest cooking splatter, like the coffee bar and sink runs in this project, with a smoother surface behind the range.
14. Backsplash Framing a Statement Range Hood
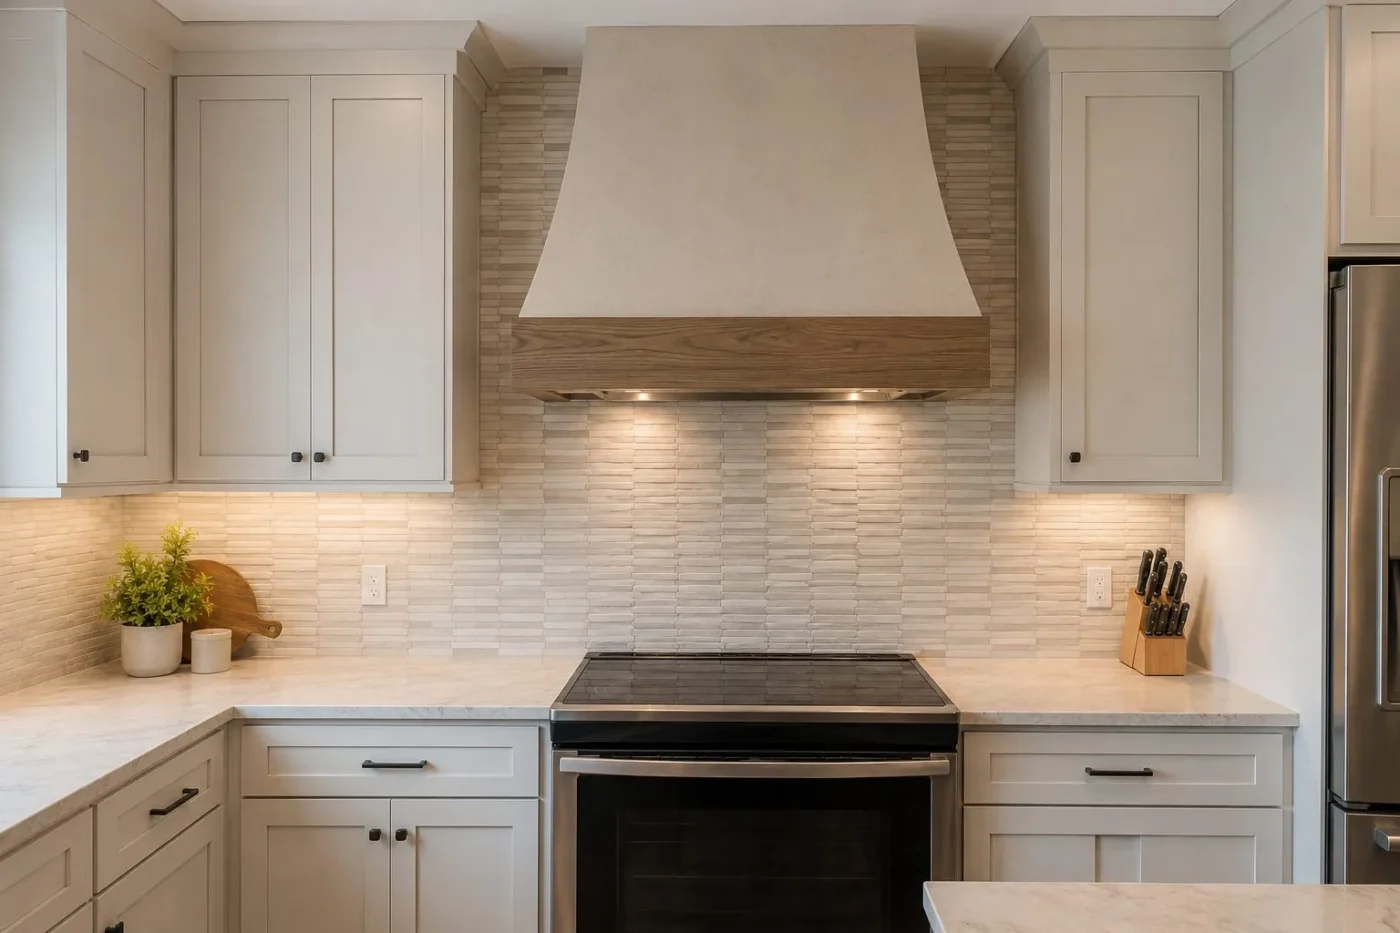
The best backsplash designs work with the architecture around them. In this Sarasota kitchen, designer Lindsey ran a textured linear stone mosaic in soft travertine tones full height behind a curved plaster hood with a white oak band, and the two were designed together from the first rendering so the proportions balance. The thin dimensional strips give the wall a quiet texture that plays against the smooth sweep of the hood, warm where the hood is soft, detailed where the hood is simple, and the under cabinet lighting rakes across the relief so the wall changes character from morning to evening. Sarasota clients select tile like this in person at our Clark Road location, comparing full pieces side by side rather than guessing from a two inch sample chip. You can see more finished kitchens like this one in our project gallery.
Which Backsplash Fits Your Kitchen Style
If you are torn between several of the ideas above, this is how our designers typically match backsplash types to the kitchen around them. Use it as a starting point, not a rule, because the counter, cabinets, and light in your specific kitchen always get the final vote.
| If your kitchen is… | Strongest picks from this page | Why it works |
|---|---|---|
| Modern or contemporary | Full slab (1, 3), vertical stack (8), large format porcelain (6, 10) | Clean lines, minimal grout, and uninterrupted surfaces match flat panel and slim shaker cabinetry |
| Farmhouse or cottage | Subway with contrasting grout (4), zellige (5), picket (9) | Handmade texture and classic shapes bring the warmth these kitchens are built around |
| Transitional | Herringbone (7), hex blend (12), marble look porcelain (10) | Pattern with restraint bridges classic and current without dating the kitchen |
| Cleaning is the priority | Quartz slab (1, 2, 3), porcelain panels (6, 10) | Zero or minimal grout means the wall wipes clean in one pass, a real factor in humid Florida kitchens |
7 Backsplash Mistakes to Avoid
One mistake we see repeatedly is homeowners choosing the backsplash before the countertop. The counter is the bigger surface and the bigger investment, so our designers always reverse that process. Pick the counter first, then let the backsplash respond to it.
Kari, CMK designer
- Choosing tile from a tiny sample. A two inch chip cannot show you pattern repeat, sheen, or how the tile reads across an eight foot wall. Look at full pieces, and ideally a full mockup, before ordering.
- Ignoring the grout decision. Grout color changes the entire design. The same white subway tile looks crisp with white grout, graphic with charcoal grout, and warm with greige grout. Decide tile and grout together, never separately.
- Stopping the backsplash at 4 inches. The short 4 inch counter stub reads as builder grade in today’s market. Run tile at least to the bottom of the upper cabinets, and consider full height behind the range.
- Picking the backsplash before the countertop. The counter is the bigger investment and the bigger surface. Select it first, then choose a backsplash that complements it rather than competes with it.
- Forgetting outlet placement. Nothing ruins a beautiful slab or pattern like a crooked outlet in the middle of it. We plan outlet locations, or switch to under cabinet outlet strips, during design so the finished wall stays clean.
- Underestimating installation skill. Stacked grids, herringbone, and slab installs are unforgiving of sloppy work. The material is only half the finished product. The setter is the other half.
- Treating the backsplash as an afterthought. When the backsplash is chosen last under deadline pressure, it usually ends up safe and forgettable. Give it the same design attention as the cabinets and counters.
What a New Backsplash Costs in Tampa Bay
As part of a full kitchen remodel, most tile backsplashes in our projects land between $1,500 and $4,500 installed depending on tile selection, wall area, and pattern complexity. Quartz slab backsplashes typically run $3,500 to $8,000 or more because of material and fabrication. The backsplash is rarely the number that drives a kitchen budget, the cabinets and counters are, but it is often the finish people comment on first. For full project numbers by kitchen size and tier, see our kitchen remodel cost guide, and if you are dreaming bigger than a backsplash, our custom kitchens page shows what a full transformation looks like.
Ready to see these materials in person? Call (813) 379-2116 to schedule a free in home consultation. Once your project begins, you will select your exact tile and slab at the 4,000 sq ft CMK Design Studio with an accredited designer beside you.
Kitchen Backsplash Questions We Hear Most
What is the most popular kitchen backsplash right now?
The full height quartz slab backsplash is the most requested design in our current Tampa Bay projects, followed closely by large format porcelain and zellige style glazed tile. The common thread is fewer grout lines and more visual calm. Homeowners who spent years scrubbing grout in their old kitchen almost always steer toward slab or large format when they see the options side by side. That said, classic white subway with a contrasting grout remains the most installed tile in our history because it works in nearly every home style, from a Seminole Heights bungalow to a Lakewood Ranch new build, and it leaves budget room for better cabinets and counters where the money matters more.
Is a quartz slab backsplash worth the extra cost?
For most of our clients who choose it, yes, and the reason is daily living rather than looks alone. A slab backsplash has zero grout lines, so cleaning the wall behind your range takes one wipe instead of a scrub session, and there is no grout to discolor, crack, or reseal over the years. It also creates a seamless visual connection with the countertop that makes the whole kitchen feel custom. The honest tradeoff is cost, typically $70 to $120 per square foot installed versus $25 to $60 for tile, and less opportunity for pattern and texture. Many homeowners split the difference by putting slab behind the range only and tile on the remaining walls, which captures most of the benefit at a fraction of the price.
Should my backsplash match my countertop?
It should coordinate, but it does not have to match. There are two approaches that consistently work. The first is the matched approach, using the same quartz slab for counter and backsplash, which creates a seamless, unified look and is the foundation of the slab trend. The second is the complementary approach, where the backsplash picks up a secondary tone from the counter veining, the cabinet color, or the flooring, so everything in the room feels connected without being repetitive. What our designers caution against is choosing a backsplash in isolation. Bring your counter sample, cabinet door, and flooring together when you make the tile decision, because a tile that looks perfect alone can fight the room once everything is installed.
How high should a kitchen backsplash go?
At minimum, run the backsplash from the countertop to the bottom of the upper cabinets, which is usually about 18 inches. Behind the range, where there are typically no upper cabinets, running the material full height to the hood or ceiling is the current standard in well designed kitchens and it is what we recommend on nearly every project. The old 4 inch backsplash stub that matches the counter is the one treatment we suggest avoiding, because it reads as dated builder grade and it leaves the wall above it exposed to splatter anyway. Going full height on every wall, counter to ceiling, is a bolder design move that works beautifully with open shelving or minimal upper cabinets, as in our St. Petersburg project above.
What backsplash is easiest to keep clean in a Florida kitchen?
Ranked by real world cleaning effort, quartz slab is easiest because there are no grout joints at all, followed by large format porcelain with minimal grout lines, then standard glazed ceramic or porcelain tile, with small mosaics and heavily textured tiles requiring the most attention. Florida adds two factors most national advice ignores: humidity, which keeps surfaces damp longer and can encourage mildew in porous grout, and the amount of cooking many of our clients do at home year round. If low maintenance is your top priority, choose a nonporous surface, minimize grout, and have the grout that does exist sealed properly at installation. Every tile backsplash we install includes proper grout sealing as part of the finished work, not as an upsell.
Can I replace just my backsplash without remodeling the whole kitchen?
Yes, a backsplash can be replaced on its own, and it is one of the highest impact single updates a kitchen can get. The practical considerations are drywall condition behind the old tile, since removal often damages the wall surface and requires repair before new tile goes up, and how the new backsplash will look against your existing counters and cabinets. If your countertop is also dated, it is usually smarter and more cost effective to do counters and backsplash together, because the counter installation determines the exact height the backsplash starts from and doing them in sequence avoids redoing work. During a free in home consultation we will tell you honestly whether a standalone backsplash makes sense for your kitchen or whether pairing it with other updates gets you a better result for the money.
What tile brands does CMK Construction install?
Our primary tile lines are Emser and Happy Floors, both of which you will see throughout the projects on this page, and our quartz slabs are Cambria. We standardized on these brands because their quality control is consistent, their Florida distribution means realistic lead times for our project schedules, and their catalogs are deep enough to cover every style from handmade look zellige to large format marble look porcelain. Once your project begins, you will review and select your exact tile with an accredited designer at the 4,000 sq ft CMK Design Studio, comparing full size pieces under proper lighting instead of ordering from a website photo. As a state certified general contractor, CGC 1516665, we handle the full installation in house from wall prep through grout sealing.